refrigerator magnets

refrigerator magnets

Monday, December 12, 2011

Crock Pot Roast Beef and Homemade Bread

Ah Sunday, what a fantastic day to spend in the kitchen. Probably one of my most favorite things to do is hop into the kitchen, crank up the Patriot's game, throw-on my Pancake! apron and cook up a storm! This past Sunday was even better though... we are a two football team household, Matt is a die-hard Brown's fan and I, as previously mentioned love the Patriots. The Brown's weren't playing Sunday which free's Matt up! Yay! Which also means he decided to take on the crock pot. Oh and I'm so glad he did! The man know's how to cook-up a mean piece of beef.  It's a very easy recipe that you could do with any piece of beef. We happened to snag a nice looking piece about 2-3lbs at the food store that morning. Fantastic. Unfortunately, we where too hungry before I snagged a photo of the final meat but I'm sure you can imagine how tasty it looked.

Easy Crock Pot Roast Beef
2-3lbs would feed about 4 ppl, it does shrink a bit while it cooks

Ingredients
Big hunk of meat - we used a 2lb piece of roast beef
1 cup (or at least 1/2 inch covering the bottom of pot) of soy sauce. (I have a large crock pot so we added a bit more sauce to ensure the bottom was covered.)
1 tsp salt and pepper covering both sides of meat
1 tsp of garlic salt
1 tsp of grilling spices
1 tablespoon flour (For gravy)

Steps
  1. Turn your crock pot on high
  2. Salt and pepper each side of the meat
  3. Plop the meat into the crock pot
  4. Add in the soy sauce - ensure that it covers the bottom of the pot, and about 1/2 inch up the side of the meat
  5. Sprinkle in the garlic salt and grilling spices on top of the meat
  6. Cover and DON'T TOUCH IT for at least 4 hours
  7. Feel free to open and check starting at around 4.5 hours and cook until done. It should turn gray. 
  8. After it's done, pull the meat out and set it aside to rest. If you cut into it right away, you'll let all the juices out. Letting it rest lets the juices soak into the meat.
  9. Add the flour to the juices left in the crock pot. Mix to make a nice rich gravy. Add more or less flour depending on how thick you want your gravy.
While he tackled the beef, I decided that it was finally time to take on some homemade bread. I haven't perfected my recipe yet - but I'll share a few photos with you of my first pass. If you have an easy to make bread recipe, I'd love to check it out!


Monday, December 5, 2011

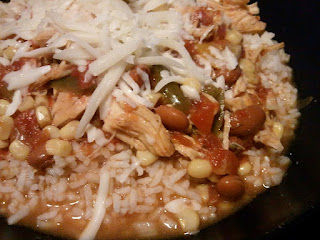
Mexican Crock Pot Chicken

I'm a novice crock-potter. I've had more failures than successes with this sucker but I'm determined to figure out how to make it work for me. I am a expert at making chicken soup so I thought, how different can that be from using a crock pot. GENIUS MOMENT! We've come to find in our house that we both really love pulled chicken... pulled chicken, crock pot, soup BINGO. This recipe is inspired by recipe I found in my new favorite cookbook, The Southern Living Cook Book. No, I'm not making any money off of promoting this sucker, I just have found it to be a great resource for inspirations for new recipes and easy recipes. Check it out and I'd love to know what you think.

Also, I'll make one last request of you fine reader - with my novice status of crock potting, I'd love to see your recipes and test them out! Please comment on this post and share a recipe or link to your blog with a recipe. Thank you!

ANYWAYS... on to the recipe for my Mexican Crock Pot Chicken

Mexican Crock Pot Chicken
(this is about 4 servings worth, add more chicken and the servings increased, there is certianly room for it in the broth.)

Ingredients
(This recipe is for 4 servings approx, adjust meat and liquid for more servings)
  • 2 chicken breasts
  • 1 tsp oregano
  • 1 tsp cumin
  • 1 can petite cut tomatoes - drain the juice
  • 1-2 tsp of sea salt (to taste)
  • 1 tsp chili powder
  • 1 can pinto beans - with juice
  • 20 oz of chicken stock (if you add more chicken breast, add more stock - just make sure the chicken is covered)
  • 4 garlic cloves, chopped
  • 4 chicken sausage - spicey
  • 1 cup frozen corn
  • 1 cup frozen peppers
Steps
  1. Plug in your crock pot and turn it on to High. I have a 6 quart cooker as an FYI for the amount of liquid. The amounts listed above are suggestive - just make sure you have enough liquid to cover the chicken breasts and the sausage. 
  2. Add your beans to the bottom of the pot and then add the garlic. 
  3. Plop the chicken on top and mix in the remaining ingredients, except for the peppers and corn. 
  4. Cover the pot and let it cook for 4 hours. 
  5. Add the veggies and cook for an hour.
  6. Pull out the chicken and pull it apart with a fork so it's shredded. I added it back into the pot and turned it down to warm.
  7. You're ready to eat! Serve on top of some rice and maybe top with a little cheese.

Monday, November 28, 2011

Post-Thanksgiving and Spinach Balls

Matt's Green Bean Casserole & my Spinach Balls, ready & waiting for Thanksgiving
Delicious. That's about all I have to say about my Thanksgiving. I've been doing a TON of baking recently but nothing that is my own original recipe - you could call me the cookie queen right now. Oatmeal chocolate chip (they where ok), chocolate mint and a new chocolate chip cookie recipe. Once I perfect them, I'll share those recipes. I'm telling ya - the chocolate mint one (it's from King Arthur Flour) is freaking fantastic. We froze them as well and it's like having a thin mint you made yourself. Glorious.

Let's talk Thanksgiving for a moment. I"ll put it out there - I didn't do the cooking. I was charged with bringing a tasty appetizer. Matt was charged with his killer green bean casserole (pictured in the photo at the beginning of this blog post.) In my appetizer research, I wanted to come up with something that was easy to eat, not too terrible for you and did I say easy?

Enter Spinach Balls. Tiny balls of green leaves, made with stuffing. They where also a huge hit and very easy to make. Best part? You can make them AHEAD OF TIME, freeze them and bake them the day of your fiesta.
SPINACH BALLS APPETIZER
Makes a little over 2 dozen - 1 inch balls, smaller the ball, more the recipe will make.

Ingredients
1 package frozen, chopped spinach (around 10oz), thawed and drained
2 cups dry stuffing mix - I used StoveTop b/c the bread-bits are small
3 eggs, beaten
1/4 cup grated Parmesan
1/4 cup shredded Mozzarella cheese
1/2 onion, chopped finely
2 tablespoons melted butter

Steps
Prep the spinach, making sure it's drained and thawed and chopped up
Mix all the ingredients together well in a bowl and pop it into the fridge for about 30 minutes to let it set
Pre-heat oven at 350degrees F, if you're baking today
Prep a baking sheet or two with either cooking spray or parchment paper. Create balls, approx 1 inch or smaller in size

To Freeze for Later:
Pop the tray into the freezer (if you're going to freeze the balls for later) for at least an hour to let them freeze
After an hour, you can put them into a more space-friendly container and keep in freezer till ready to bake
To bake them - let them thaw for about 20-30 minutes prior to putting them in the oven

To Bake for Today:
Pop the trays into the oven and bake for about 20-25 minutes until they start to get a little brown
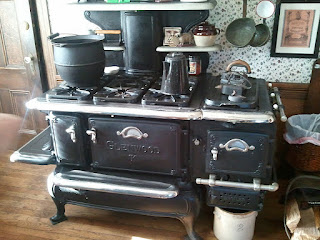
Lizzie Borden House Stove
On a totally side note, we went a few weeks ago to visit the Lizzie Borden House in Fall River, MA. Yeah, it's haunted and there are all kinds of ghost, I'll spare you the creepy details but the best part of the trip? The fantastic stove that I had to snap a photo of to share... Who doesn't want one of these for their house? It's been converted to gas also. LOVE IT!

Monday, November 7, 2011

My Grandma's Chicken Soup

It's getting colder outside and that means it's almost cold season. What cure's any common cold? Homemade Chicken soup. It's true. Well, it always has for me. Especially when cooking my grandma's recipe which I will share with you. This recipe not only makes you FEEL better but the smell of the soup cooking in the house is absolutely amazing. If one of those scented candle companies could bottle up this scent and make a candle, I would buy all of them. No joke. Anyways...

In my house, when my mom would make the soup, she always made a ton so we could eat some of it that day and then freeze the rest for consumption sometime during the winter. We always had a special process for eating it that day - make the stock and separate some out to freeze, remove the chicken and veggies, set aside, make some egg noodles, pour some soup into a bowl, add the veggies and chicken you want and microwave that sucker for 2-3 minutes, add your noodles and eat it!


My Grandma's Chicken Soup Recipe
Ingredients:
  • Chicken - there are a few ways to add chicken, I hate touching chicken bones so I usually use 4 chicken breasts but it takes a bit longer for the stock to cook this way. The traditional recipe calls for 1 large chicken or 3-4 large chicken breasts with bone-in.
  • Water - amount TBD
  • 2 onions
  • 3 celery stalks with tops on
  • 2-3 large carrots
  • 2 parsnips (optional)
  • 1 bullion cube - make sure it's the Kosher kind, less salt and taste better
  • sea or kosher salt
  • egg noodles if you're eating it that day
Steps:
  1. In a big pot, add in the chicken. Cover the chicken in water and then pour in any additional water for the amount of soup you'd like to make. Remember, the soup will reduce down by at least 1/4 during the cooking process. It's not an exact science. Cover the pot.
  2. Bring the water up to a boil (takes approx 20 minutes). During this boiling process, you're going to need to keep an eye on it and skim off any of the foamy stuff that is created.
  3. After the skimming is completed, cut the onions and celery in half and add them to the pot, add in the bullion cube and a pinch of salt (1/2 teaspoon)
  4. Bring the mixture up to a boil again and then turn the heat down so its simmering. Let it simmer for 45 min. I alternate cover on, cover off at this point, checking in on the soup every 15 min or so, stirring occasionally as well.
  5. Add in the carrots and parsnips and simmer again for another 40 minutes. Taste it as well to see if you need a bit more salt. 
  6. At this point, snag one of the chickens and see if its cooked. You don't want to overcook the chicken and dry it out. If the chicken is done, grab them and save them for eating later. It's my favorite kind of chicken to use in a pot pie.
  7. You can cook the soup for a few more minutes to reduce it down and bring out more of the chicken flavor if you want. 
  8. Once it's done, let it cool and skim off the fat before serving or freezing.
  9. Yum!

Wednesday, November 2, 2011

Meat Logs

Have you ever tried to eat a meatball sub and lost a ball? Or had a meatball sub and had the meatballs all sliced up so they aren't even close to being ball-shaped anymore? I have. It stinks. At this point, I had a great idea - meat logs! How come no one ever tried it before? I have no idea but I think it's pretty genius. Just shape the meat into a log that fits into the bun for your sandwich and you'll never lose a ball again!

HA! Way too many dirty jokes I could include in there but I'll steer clear... with that said, meat logs!

Meat Logs
Recipe makes 4 logs - serves 2 very hungry people

INGREDIENTS
  • 1 package of ground meat (we used beef)
  • 1 tsp oregano
  • 1 tsp basil
  • 1 tsp garlic powder
  • 1/3 cup italian flavored breadcrumbs
  • 1 good squirt of ketchup
  • 1 good squirt of mustard (we used the grainy kind)
  • Tomato sauce - about a cup or two depending on how much you like on your sandwich
  • Franks Red Hot Sauce
  • Bun - that can handle the meat log!
  • Cheese (optional)
  • 1 tablespoon oil for the pan to cook the logs

STEPS
Mix the spices, ketchup, mustard, bread crumbs and meat together in a bowl till well combined
Prep the buns - make sure they are sliced, and I add a little cheese to the bottom of the bun also
Form the meat into logs that will fit into your bun, we ended up doing two logs per bun since the longer logs wouldn't fit into the pan that we cooked them in
Add the oil into the pan and turn it on to medium
Add the logs one by one into the pan
Brown the outside of the logs by rolling them around in the pan
Add a few drops of Franks to each log at this point, this will sear the Franks to the outside of the log.
Cook the logs till they are cooked through
Cover with tomato sauce and let cook for about 1 minute to heat up the sauce
Plop the meat logs into the bun and top with a bit more cheese
Enjoy! Yum.

Monday, October 31, 2011

Roasted Butternut Squash

Image Credit: Whole Foods Market
Very very delicious and very very simple - Roasted Butter Nut Squash. I love squash, pumpkin and other gourd-like veggies. Matt does not. So I had a simple solution - I bought a pacakge of already cut-up squash and roasted that sucker so I could eat it at my leisure and he won't have to tolerate it as part of a meal. Very simple and easy recipe...

Roasted Butternut Squash

Ingredients
  • 1 package of butter nut squash or one squash cut up into 2-bite size pieces
  • Olive oil
  • Sea salt
  • Fresh cracked pepper
  • Tin foil

Steps
  1. Pre-heat oven to 375-400degrees F
  2. Put the tinfoil down on a cookie sheet to cover the surface, this makes it much much easier to clean later. I promise.
  3. Coat the squash in the olive oil. The amount of oil depends on the amount of squash - I use enough that all sides are coated but not dripping. Like a light salad dressing amount. 
  4. Lay the squash on the cookie sheet and drizzle the salt and pepper lightly over top and toss again so it's coated. 
  5. Pop the tray into the oven for 45 minutes. The oil will bubble but if you touch the squash, it should be close to done - taste test it. I usually end up popping it back in the oven for another 15 minutes. I like my squash almost mashable - it gets nice and caramelized.
  6. Yum!

Wednesday, October 26, 2011

Easy and Quick Potato, Broccoli & Cheese Soup

I'm a little bit of a recipe hoarder and was rifling through a BIG binder of recipes I've collected over the years looking for an apple crisp recipe. I'm sure you all have a folder, drawer or box that you keep recipes in also, one you've been meaning to organize and throw out recipes you don't like. yeah, I've been meaning to do that also. I didn't find the one I was looking for but I did find this one for a tasty potato, broccoli and cheddar soup that, with a few tweaks, is not that bad for you. Also - the ingredient amounts are suggestions, based on your preference, feel free to tweak. Making soup is not an exact science.

Easy (and quick) Potato, Broccoli, Cheese Soup
4 servings worth (feeds 4 very hungry people)

Ingredients:
  • 4 cups chicken stock (low sodium)
  • OR
  • 1 bullion cube of chicken stock and 4 cups water
  • 4 cups broccoli - diced
  • 1 cup carrots - diced
  • 1 cup celery - diced
  • 2 - 2 1/2 cups frozen potato hash/homefries
  • Salt and pepper to taste
  • 2 tablespoons whole wheat flour
  • 1 cup milk
  • 7 oz of cheese (I used low-fat cheddar chunks)

Steps:
  1. Get a nice big pot, put the sucker on the stove and add in your liquid (chicken stock or water and bullion cube)
  2. Add in the broccoli, carrots, celery, potatoes, salt and pepper
  3. Cook for about 15-20 minutes at a nice slow but steady boil
  4. Combine the milk and flour so they are nicely mixed together - this makes it nice and creamy. Add to the soup, stirring the entire time to thicken the soup.
  5. Add in the chunks of cheese - so they melt as you add them, keep on mixing.
  6. Let that sit for another 5-7 minutes
  7. You can either eat it at this point, or I used my new immersion blender to mix it up just a bit, still leaving a few good chunks of veggies.
  8. This would be very tasty served with some crusty bread.

Monday, October 24, 2011

Apple Picking, Apple Sauce, Apple Crisp and Piggies!

A little late in the season, but better late than never! I was able to hit up Honey Pot Hill Orchards in Stow, MA for a little apple-picking trip with my good friend Rach (giving her a little plug here since she's a yoga teacher and I'm always trying to recruit her a few more clients... check out her website.) The trip was uneventful except that for the piggies!
Aren't they cute?

ANYWAYS... after returning home, it was time to get down to business. Having a full bag of apples, I decided on 3 recipes. 1. Apple Crisp, 2. Apple Bread, 3. Apple Sauce. This post will include the recipes for the Apple Sauce and the Apple Crisp. I'll do a post later this week with the apple bread recipe.

I also have to say I finally purchased an immersion blender and I'm pretty excited about it!!! Would love to hear from you on any good recipes you may have using the immersion blender.
APPLE SAUCE
# of apples determines the serving - I'd say about 2-3 good sized apples equals about a meals worth of apple sauce

Ingredients:
  • Apples - peeled and cut up into large chunks, or quarters is fine
  • 1/2 cup apple cider
  • Pinch of cinnamon
  • 1 tablespoon brown sugar (optional - you could also use honey)
Steps:
  1. In a sauce pan, add the apples, cider and spices
  2. Heat till the apples start to breakdown, and become mushy
  3. Use your immersion blender to cream a little (depending on the consistency you want)
  4. Let cool a bit and eat!
APPLE CRISP
This recipe is a bit watery - next time I'm going to add a bit of flour to the apples before putting the topping on - to help with the juicy-ness.
  • 5-6 Large apples (I used macoun's)
  • 1 stick of very cold butter
  • 2/3 cup rolled oats
  • 1 cup brown sugar
  • 1 tsp cinnamon (or pumpkin pie spice)
  • 1 tbsp white sugar
  • Lemon juice to coat apples so they don't turn while prepping
Steps:
  1. Preheat oven to 350degrees
  2. Slice the apples thinly and cover with a pinch of the cinnamon and the white sugar.
  3. Apples tend to shrink when cooked, meaning they get mushy and sink into the vessel you're prepping them in so lay them in the pan (I used a deep pyrex bowl) so there aren't any spaces. 
  4. Mix together the remaining dry ingredients and dice in the butter. The cooler it is the better since it will spread more evenly throughout the topping mixture. I diced it up then used my hands to smush it together. It should be a bit grainy feeling when done - a little dry and not like a dough at all. 
  5. Spread the topping around over the apples.
  6. Bake for 30 minutes - or until the topping is hard to the touch and you see the juices bubbling.
  7. Let is cool for about 15-20 minutes before serving since the juices from the apples will be hot.

Thursday, October 20, 2011

Chilaquiles

When we where in Cancun, we had this dish called Chilaquiles that we both fell in love with. It's traditionally served for breakfast, made from leftovers from the dinner before consisting of corn tortillas, sauce and chicken. I had to know how to make it. We've been talking about it for months and finally had the time and energy to tackle figuring this sucker out. This photo isn't the best but this recipe is now in our permanent rotation so I'll take a better one and repost.

It's really not that hard, I just had to remember to pick up the right ingredients at the store. We added our own little twist but I'm not sure we'd do it again - added refried beans to the mixture makes it way to thick although Matt liked it, I think I prefer them on the side.

I also watched this video from Saveur on technique tips along with using this recipe as influence from The Reluctant Gourmet. I promise to make these again - and show more photos for the steps.

Chilaquiles
this recipe is for 2 people who are very hungry

INGREDIENTS
3 small breasts of Chicken - shredded
1 onion, 1/2 to put in the water with the chicken, 1/2 finely diced
2 cloves finely chopped garlic
1 can enchilada sauce
1-2 cups mozzarella cheese
1/2 cup chopped queso blanco
salt and pepper
refried beans (side dish)
corn tortillas - about 2-3 per person
oil for frying - we used vegetable oil but you could use corn or canola
Sour cream (optional)
Salsa (optional)

STEPS
Cook Chicken
- fill a pot of water to cook the chicken in, add a bit of salt and half the onion to season the water, set it to a rapid boil
- plop the chicken into the water until it's cooked
- take it out and shred with a fork or chop it up into small bites
- discard the water and onion

Fry the Tortillas
- fill up a frying pan with about an inch of oil
- heat that up! you can tell if the oil is ready by putting the butt-end of a spoon into the oil, if there are bubbles around the edge of the spoon, it's ready
- Take the tortillas and cut them into quarters - like chips
- drop the tortillas into the oil, one at a time, don't over crowd the pan and fry till crispy
- take out the fried tortilla and place on a paper-towel to let the excess oil drain off

Finish the Dish
- In another pan, sauté the garlic and onions a little bit (about 2 minutes)
- add in the enchilada sauce - i used a small can of the sauce from the store
- OPTIONAL - I also added a few big tablespoons of salsa
- add in your chopped chicken and sauté the mixture till combined and the chicken is cooked thoroughly
- OPTIONAL - I also added our refried beans to the mixture, I would not recommend doing this in the future
- add in the fried tortillas till they are well coated and mixed in
- plop them on a plate and top with the mozzarella cheese and chopped queso blanco (or sour cream)

Yay!

Monday, October 17, 2011

Eggless Chocolate Chip Cookies

I'm not vegan, but I am lazy. We didn't have any eggs so I resorted to google and found out that 1 egg equals 1 tsp of corn starch mixed with 1/4 cup water. SCORE! So... eggless chocolate chip cookies! I also know that chocolate chip cookies are very tasty if you add in a little bit of creamy dairy - sour cream or plain yogurt, neither of which I had in the house because I hate sour cream and plain yogart is not so pleasant either. I do know that plain goat cheese has the same effect so... there ya go! I ALWAYS have goat cheese in the house.

I am going to make a claim that this is the best tasting chocolate chip cookie dough I have ever made. Ever.

Eggless Chocolate Chip Cookies

Ingredients
  • 1 cup brown sugar, firmly packed
  • ½ cup granulated sugar
  • 1½ sticks butter (salted), at room temperature
  • 2 tsp corn starch mixed with 1/2 cup water
  • 1/2 tsp Pumpkin pie spice (nutmeg and cinnamon)
  • 2 tsp vanilla extract
  • 2 oz of plain goat cheese (Trader Joes makes single serving medallions - I used two of those)
  • 2½ cups whole wheat flour
  • 1 tsp baking soda
  • 1 tsp baking powder
  • 1 tsp sea salt
  • 1 bag of semi-sweet chocolate chips

Steps
  1. Preheat oven to 350degrees F
  2. Mix the sugars, butter, corn starch mixture, pumpkin pie spice, vanilla and goat cheese together so it's nice and creamy.
  3. Mix in the dry ingredients
  4. Taste to ensure you don't need to add any more salt or sugar to balance the sweetness.
  5. Scoop on to parchment paper lined cookie sheets and bake for 12-15 minutes. (Revision - I made larger scoops of dough - about 1.5 inches in diameter)
  6. Let them sit and cool a bit before serving.

Tuesday, October 4, 2011

It's almost apple season!

I had a beautiful photo or two on my phone of a fantastic apple pie I made this weekend and was going to share... Alas, my phone has decided that it no longer wants to be in this world and took a long nose dive from my bag to the floor and did not survive. The photos went along with it. I do have one that I've popped on facebook so hopefully that will get the drooling started a little bit.

But let's take a moment to talk about one of my most favorite foods in the world - pie. I've tried so many ways to make the perfect apple pie. Some come out too juicy, some too dry, some too over baked and some are just plain bad.

I'd love to know some of your tips and tricks to making the perfect apple pie. I like mine juicy and moist on the inside, usually made with a mix of apples (honey crisp and cortlands are tasty) with a good cinnamon flavor. This time I tried to make a roux and then add the sugar and spices. It was ok... not enough butter.

I had 1/2 stick butter, 1/2 cup wheat flour, 1/2 cup sugar, a good share of cinnamon, pumpkin pie spice and nutmeg, 4 cortlands and 2 honeycrisp apples.

The best tip I received when making a pie was from Bea Viera, to line crust for the first hour of baking with aluminum foil so it doesn't burn. Then remove it for the last 10 minutes or so.

Feel free to post a comment and share some of your great pie-baking and making tips! Doesn't have to be apple pie either. :-)

Thursday, September 22, 2011

Dessert Judging... SO FULL

Last night I judged the First Home Sweet Home Amateur Bake-Off Contest with a few other local bloggers. I can't tell you who entered, who won or how it went. All I can share with you is this photo...
The other judges included:
If you'd like to attend the final event on Oct 22nd, or get more information, please visit: http://www.chafund.org/pages/dessert.html

Monday, September 19, 2011

The Best Chicken Pot Pie

Yep. You read that correctly. This recipe is the BEST chicken pot pie recipe you will ever see. And if you find one that is better, please let me know and we'll have a pot - pie - off!

I don't think I need to say more than that. Except it's now getting a bit colder out and I wanted pot pie so I made it. You make all the elements from scratch if you want or you can sub in pre-made items. I've done both depending on the amount of time I have available. Below is my standard recipe. I also buy as much as I can that is low sodium or unsalted, I find adding my own salt to my taste preferences makes a HUGE difference.
Chicken Pot Pie
INGREDIENTS:
  • 2 sticks of butter - unsalted
  • 1 cup of whole wheat flour (this gives it a nice texture and I like it better than white AP)
  • Salt - to taste
  • 1 quart chicken stock - low sodium
  • 1 cube chicken stock - the kosher kind usually tastes better
  • 1 cup hot water (to dissolve the chicken stock cube)
  • 1 tsp thyme
  • 1 tsp basil
  • 1 tsp onion powder
  • 1 tsp oregano 
  • Sea salt and pepper to taste
  • 2 cups (approx.) shredded, grilled chicken - with a little salt and pepper seasoned but nothing else
  • 5 small potatoes, chopped and cooked (sometimes I use 2 sweet potatoes)
  • 1 1/2 cup of sweet peas, cooked
  • 1 1/2 cup of sliced carrots, cooked
  • 2 sheets of pastry dough, defrosted
  • Butter to grease pan
STEPS:
1. Preheat oven to 400degrees F
2. Heat/cook your peas, carrots, chicken and potatoes. A quick trick to quickly steam the veggies is to pop them each individually into a bowl and add a little water to the bottom of the bowl. Then cover the veggies with a wet paper towel. Pop them into the microwave for about 2 minutes for the peas and carrots, and about 5 - 6 minutes for the potatoes.
3. In a stock pot, pour in the chicken stock and the chicken stock cube disolved in a cup of hot water. Set this to a high simmer. This should be hot when you start the next step.
4. In a sauce pan - melt the butter down on the slower side so the fats don't separate too much. Whisk in the flour slowly to make a roux. Once the mixture is set, whisk it into the stock mixture.
5. Once the roux and stock are completely mixed, add in the veggies and chicken. Mix thoroughly and add in the spices - salt and pepper to your own taste. Let this lovely concoction heat together for a few minutes while you prep your pot pie vessel.
6. I butter the bottom and sides, then take the first piece of pastry dough and cover the bottom and sides. 7. Then I pour in the filling - as much as will fit. There is always a little leftover for those who are waiting patiently :-) then I cover the entire thing with the last sheet of dough. Poke a few small fork holes in the top just to let the air out. You can do a light egg-wash across the top if you'd like.
8. Then I pop this sucker into the oven until the pastry dough turns a golden brown - around 10- 20 minutes depending on your oven.
9. Let it cook for about 15 minutes before you serve.
The filling also freezes well also.

Wednesday, August 31, 2011

2 food competitions and 1 new business

I've got three great announcements to share with all my lovely readers out there - 2 awesome recipe competitions and 1 fantastic announcement from a friend. 

FLUFF CONTEST
Date: Sept 24th
Location: Union Square, Somerville Ma
Enter Here: http://wickedgoodtravel.com/2011/08/contest-giveaway-what-fluff-festival/

Are you a fan of Marshmallow Fluff? Does it remind you of childhood memories of having the perfect combination of a Fluffernutter, do you dream about it swirled into Nutella for a delectable, chocolate, “fluffy” delight? If you said ‘yes’ then you are in luck! On September 24th, Union Square Main Streets is holding their Sixth Annual “What the Fluff” festival to honor the creamy delight. They'll have food, games, entertainment, even a celebrity appearance by Susan Olsen, or 'Cindy', from the Brady Bunch. And there's still time to enter the Fluff cooking contest, which boasts some top prizes, including a tour of the factory (a rare treat)! To celebrate the local blog, Wicked Good Travel & Activities, is holding a giveaway contest. Just go over to Wicked Good Travel & Activities between August 31st and September 12th and leave a brief comment here  in the form of creative recipes, prose, poetry, and more- all expressing your love for Marshmallow Fluff. Two winners will be chosen, so give us your best! One will receive a Fluff tote bag and the other 1 will receive 2 free studio classes at The Training Room. All winners will also be featured on Wicked Good Travel & Activities, Somerville Patch, and Union Square Main Streets.


So, what the fluff are you waiting for? Enter the contest and SHOW US YOUR FLUFF!


HOME SWEET HOME BAKING COMPETITION
Date: Sept 12th for entry
Location: Cambridge, Ma
Enter here: http://how2heroes.com/home-sweet-home

Here’s your chance to compete in the First Home Sweet Home Amateur Bake-Off Contest, sponsored by the Cambridge Housing Assistance Fund (www.CHAFund.org), how2heroes and the Cambridge School of Culinary Arts. This contest is for non-professional chefs (please refer to the complete rules, details, and entry form a (www.how2heroes.com). Our Celebrity Judges include: Lee Napoli (owner of Chocolee Chocolates and founder of New England's first and only association for pastry professionals), Clara Silverstein (author of three cookbooks including The Boston Chefs Table, The New England Soup Factory and A White House Garden Cookbook, and a long-time food writer in the Boston area) and Lynne Viera (President & CEO, how2heroes). The top ten desserts in each of the food categories will be invited to a preliminary judging by a separate tasting committee of Boston area food bloggers (INCLUDING ME!!!) to be held at the how2heroes offices in Cambridge, MA on September 20th, 2011. The top three finalists per category will prepare their entries for the Celebrity Judge tasting at the Home Sweet Home Event on October 22nd, 2011 at the Cambridge Hyatt Regency. Prizes to be announced on the how2heroes website. The Grand Prize for Judge's Choice is a pastry class with Master Pastry Chef Delphin Gomes, New England’s only French master pastry chef at The Cambridge School of Culinary Arts (CSCA) and being featured in a how2heroes video. Other prizes will be awarded to the top three finalists in each category.


What are you waiting for? Start searching for your winning dessert recipe!

HOLISTIC HEALTH NEW BIZ IN RHODE ISLAND
And lastly a friend of mine at Two Blue Lemons blog has started her own holistic health practice. Woo hoo! If you have a free moment - check it out: http://sarahwaldmanwellness.com/http://sarahwaldmanwellness.com/

Monday, August 29, 2011

Hurricane-Inspired Peanut Butter Chocolate Cookies

Although there were some hard hit areas for Hurricane Irene, we where not in one of them. I blame this completely on us being fully prepared. We had charged our phones, our computers, ipods, and our kindles fully expecting to lose power. We also stocked up on a few movies as well, expecting to be stuck in the house all weekend. I also make some very stylish candelabras as well. I know you're super jealous that you don't have a pair either. Well, we didn't loose power but we were stuck in the house because of the winds. 

Being stuck in the house all day only leads to one thing - baking. Peanut Butter Chocolate Cookies - yes please! They may look small but they pack a punch and are fairly dense. Mine aren't the prettiest in the world but the dough is very easy to work with and you could do a lot of fun and creative things with them. Easy to make - we only used 1 bowl. They would also be very tasty topped with a little frosting or a chocolate bit/kiss as well.
Hurricane Peanut Butter Chocolate Cookies
Ingredients:
  • 1/2 cup (1 stick) butter, softened
  • 1 cup creamy peanut butter (or half a jar)
  • 1 cup brown sugar
  • 1/2 tsp salt - corse salt (sea salt works well)
  • 1/2 tsp baking soda
  • 1 tsp vanilla extract
  • 1 large egg
  • 1 3/4 cups whole wheat flour (or white works also)
  • 1/3 cup Chocolate Baking Powder
  • Optional - chocolate chunk or chip for the top of the cookie

Steps:
  1. Preheat oven to 375degrees
  2. Mix together the sugar, butter, peanut butter, vanilla, eggs, and chocolate powder in one bowl. Add in the baking soda, salt and flour in slowly. The dough will be thick. I used my hands. It was easier.
  3. Once it's all nicely mixed together, either pop some parchment paper or greesed tin foil on some baking sheets.
  4. The cookies don't spread out so the way you form them, will be the way they bake. Ours where about an inch in diameter and they where about 1/2 inch thick.
  5. If you are adding candy, press it down in the middle of the cookie.
  6. Bake for around 9-11 minutes based on how hot your oven is. Let them cool on the tray for about 10 minutes then transfer to the cooling rack.
  7. Happy Eating!

Wednesday, August 24, 2011

Almost Vegan Chocolate Banana Bread

Summertime is not baking time for me. It's too darn hot. I also don't have a dish washer so baking sometimes involves too many dishes. But last night I was inspired, inspired by bananas.
About a week ago my friends at Equal Exchange hooked me up with some of their Organic Cocoa Powder and I thought - bananas, chocolate - yes. I would like to eat that! Equal Exchange is a great brand - we drink their coffee at work and you can feel good about making a purchase with them since it's fairly traded. Yay!

I call this ALMOST vegan because I used butter. Real tasty buttery goodness butter. And real milk. But if you're vegan or need to bake for a vegan, feel free two swap those two out.

Almost Vegan Chocolate Banana Bread
Ingredients:
  • 1 cup All Purpose Flour
  • 1 cup Whole Wheat Flour
  • 1/2 tsp baking soda
  • 1/2 tsp sea salt
  • 1/4 Allspice, ground
  • 1/2 cup butter (or you could sub with vegan butter)
  • 1/2 cup brown sugar
  • 1/2 cup white sugar
  • 3 1/2 very ripe bananas, mashed (I leave mine a little chunky because I like biting into a bit of banana)
  • 1/2 milk (I used lactaid because that's all I had)
  • 1 tsp Apple Cider Vinegar
  • 1 tsp vanilla extract
  • 1/2 tsp almond extract
  • 1/4 cup Equal Exchange Organic Coco Powder
Steps:
1. Preheat oven to 350degrees
2. Mix together the milk and apple cider vinegar and set aside
3. In a large bowl, combine butter and sugars so it's nice and creamy
4. Mix in the milk combination, bananas, vanilla extract and almond extract
5. Add in the coco powder till completely combined
6. In a separate bowl, mix together flour, salt, baking soda, allspice
7. Add the wet and the dry ingredients together slowly to ensure the mixture is completely mixed
8. Take a baking loaf pan and either butter, or spray non-stick spray so you can get the loaf out of the pan. OR you can use parchment paper OR you can be a little creative like me, and butter up a piece of tin foil and line the pan with it.
9. Pour the mixture into the pan and spread out evenly. It is a bit thick. (I topped this one with a few sliced almonds b/c it's pretty)
10. Bake for about 60 minutes or until a toothpick comes out clean from the middle of the loaf.
11. Set aside and let cool a bit in the pan, then set on a cooling rack for a few hours till completely cooled before slicing. If you eat it hot - it's a bit dryer than if you let it sit overnight. Just an FYI.
Happy Eating!

And just because it was beautiful out yesterday, here's a nice shot of Boston I took.

Tuesday, August 23, 2011

Ground Turkey Roll-ups with Corn and Broccoli

Growing up, my mom used to make these things called Roll-ups. My grandma actually came up with them and shared the recipe with my mom. It was a once-a-week staple in my house. There were never my favorite when I was little. I thought they were a little weird but as I got older, I learned to appreciate and savor the roll-up and today, I bring the roll-up to you. 

I didn't have all the ingredients in my house to make them exactly how mom did but that's the beauty of the roll-up, you can use what you have. Sometimes you can add veggies, or cheese or different meats. It's all good. I added a quick little side dish of veggies also. 
Ground Turkey Roll-ups
Ingredients:
  • 1 package ground turkey
  • 1 tsp basil
  • 1 tsp thyme
  • 1 tsp cumin
  • 1 tsp garlic powder
  • 1 tsp onion powder
  • 1 good squirt of ketchup
  • 1 good squirt of BBQ sauce
  • 1 good squirt of spicy mustard
  • 1/2 cup to a bit more of breadcrumbs (the amount of breadcrumbs you add dictates how wet the meat is going to be)
  • Pinch of salt and pepper
  • 1 package of crescent rolls
Steps:
  1. Preheat your oven to 350degrees.
  2. Mix all the ingredients except for the crescent rolls together in a bowl. Tweak the spices based on your preferences. My mom would base the amounts on whether she thought it smelled good or not.
  3. Lay the crescent roll dough out on the counter flat, pinch together any seams that may have split open
  4. Spread the meat mixture across the dough - covering the entire area up to the edges. 
  5. My mom always rolled up the dough the long way to make more smaller rolls but I rolled up the short way - to make less but fatter rolls.
  6. Either place a piece of parchment paper on the bottom of your pan - I used a 9x13 pan but you could use a cookie sheet as well. If you don't have parchment paper - you can use tinfoil that you've buttered.
  7. Slice the roll so you have 8 equal pieces - 8 if you're rolling it the short way, more if you roll it the long way. 
  8. Plop those onto the cookie sheet and cook for about 30-35 min or until the crescent rolls look done. 
  9. Let them cool and enjoy! We always ate them with ketchup or bbq sauce on the side. 
Here's a lovely video of my mom demonstrating her technique and her recipe for these suckers.
A quick side dish... Corn and Broccoli for 2 people

Ingredients:
  • 1 cup chopped broccoli
  • 1 cup corn kernels
  • 1 shallot
  • 1 pad of butter
  • salt & pepper to taste
Steps:
  1. Sauté those suckers till they are just starting to brown.
Happy eating!

Tuesday, August 9, 2011

Chicken Tagine

Let's talk about crock pots for a moment. I have a love-hate with them. Almost everything I've made in the crock pot hasn't turned out how I wanted it. Not always bad, but not how I thought it should tasted based on the recipe provided. Or maybe i should ACTUALLY FOLLOW the recipe for once. Either way, I will conquer the crock pot but I may stick to soups for awhile.

My latest attempt at the slow-cooker is this recipe from how2heroes.com

It was pretty tasty - we didn't include the eggplant because neither one of us is a big fan, and we added a few extra carrots. BUT don't forget to include the lemon juice. I think that was my biggest mistake. Either way, tasty stuff.

Monday, August 8, 2011

Matt's Spicy Spaghetti with Meat Sauce

As with any family, we too have a few recipes that we eat at least once a week (and sometimes twice). I make 1 or 2 of them and Matt has a few goodies up his sleeves as well. Once in particular that we eat at LEAST once a week is spaghetti with meat sauce. I'm not going to call it Bolognese because it's got a little twist to it.
Ingredients:
  • 1 package of ground beef
  • 1 package of spaghetti
  • 1/4 cup Frank's Hot Sauce
  • 1 jar tomato sauce (about 3 cups)
  • 1 tsp steak seasoning
  • Sea salt
  • Vegetable oil - a dollop
Steps:
  1. Boil water according to the package directions for the pasta but add the sea salt to the boiling water. Add in the pasta and get those noodles cooking.
  2. Add the vegetable oil to a frying pan and heat it up, add in the ground beef and start to cook. You can season with a little salt and pepper if you like. Add in the steak seasoning.
  3. Cook the meat till it starts to smell like a well done burger - you want the meat to be almost well done. 
  4. Drain the grease off. 
  5. Add in the tomato sauce and the franks. Make sure you stir in the franks really well otherwise you'll have a few hots bites and the rest will be fairly mild. This is key.
  6. At this point, your pasta should be ready. Strain the pasta and serve to each dish. We like to add the pasta to the dish first then add the meat sauce on top.
  7. Enjoy!

Matt hard at work.

Wednesday, August 3, 2011

Watermelon rules.

I really love watermelon and finally they had some at the food store that looks delightful. So we bought it, we cut it up and we ate it. Just wanted to see if anyone out there shares the same love of that red and green melon as we do. Also I found this great site - thought I'd share.

What's your favorite watermelon recipe? Would love to hear it!