refrigerator magnets

refrigerator magnets

Monday, November 28, 2011

Post-Thanksgiving and Spinach Balls

Matt's Green Bean Casserole & my Spinach Balls, ready & waiting for Thanksgiving
Delicious. That's about all I have to say about my Thanksgiving. I've been doing a TON of baking recently but nothing that is my own original recipe - you could call me the cookie queen right now. Oatmeal chocolate chip (they where ok), chocolate mint and a new chocolate chip cookie recipe. Once I perfect them, I'll share those recipes. I'm telling ya - the chocolate mint one (it's from King Arthur Flour) is freaking fantastic. We froze them as well and it's like having a thin mint you made yourself. Glorious.

Let's talk Thanksgiving for a moment. I"ll put it out there - I didn't do the cooking. I was charged with bringing a tasty appetizer. Matt was charged with his killer green bean casserole (pictured in the photo at the beginning of this blog post.) In my appetizer research, I wanted to come up with something that was easy to eat, not too terrible for you and did I say easy?

Enter Spinach Balls. Tiny balls of green leaves, made with stuffing. They where also a huge hit and very easy to make. Best part? You can make them AHEAD OF TIME, freeze them and bake them the day of your fiesta.
SPINACH BALLS APPETIZER
Makes a little over 2 dozen - 1 inch balls, smaller the ball, more the recipe will make.

Ingredients
1 package frozen, chopped spinach (around 10oz), thawed and drained
2 cups dry stuffing mix - I used StoveTop b/c the bread-bits are small
3 eggs, beaten
1/4 cup grated Parmesan
1/4 cup shredded Mozzarella cheese
1/2 onion, chopped finely
2 tablespoons melted butter

Steps
Prep the spinach, making sure it's drained and thawed and chopped up
Mix all the ingredients together well in a bowl and pop it into the fridge for about 30 minutes to let it set
Pre-heat oven at 350degrees F, if you're baking today
Prep a baking sheet or two with either cooking spray or parchment paper. Create balls, approx 1 inch or smaller in size

To Freeze for Later:
Pop the tray into the freezer (if you're going to freeze the balls for later) for at least an hour to let them freeze
After an hour, you can put them into a more space-friendly container and keep in freezer till ready to bake
To bake them - let them thaw for about 20-30 minutes prior to putting them in the oven

To Bake for Today:
Pop the trays into the oven and bake for about 20-25 minutes until they start to get a little brown
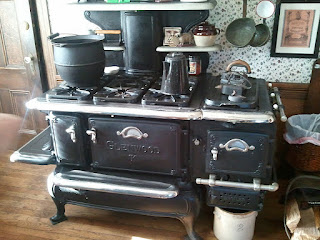
Lizzie Borden House Stove
On a totally side note, we went a few weeks ago to visit the Lizzie Borden House in Fall River, MA. Yeah, it's haunted and there are all kinds of ghost, I'll spare you the creepy details but the best part of the trip? The fantastic stove that I had to snap a photo of to share... Who doesn't want one of these for their house? It's been converted to gas also. LOVE IT!

Monday, November 7, 2011

My Grandma's Chicken Soup

It's getting colder outside and that means it's almost cold season. What cure's any common cold? Homemade Chicken soup. It's true. Well, it always has for me. Especially when cooking my grandma's recipe which I will share with you. This recipe not only makes you FEEL better but the smell of the soup cooking in the house is absolutely amazing. If one of those scented candle companies could bottle up this scent and make a candle, I would buy all of them. No joke. Anyways...

In my house, when my mom would make the soup, she always made a ton so we could eat some of it that day and then freeze the rest for consumption sometime during the winter. We always had a special process for eating it that day - make the stock and separate some out to freeze, remove the chicken and veggies, set aside, make some egg noodles, pour some soup into a bowl, add the veggies and chicken you want and microwave that sucker for 2-3 minutes, add your noodles and eat it!


My Grandma's Chicken Soup Recipe
Ingredients:
  • Chicken - there are a few ways to add chicken, I hate touching chicken bones so I usually use 4 chicken breasts but it takes a bit longer for the stock to cook this way. The traditional recipe calls for 1 large chicken or 3-4 large chicken breasts with bone-in.
  • Water - amount TBD
  • 2 onions
  • 3 celery stalks with tops on
  • 2-3 large carrots
  • 2 parsnips (optional)
  • 1 bullion cube - make sure it's the Kosher kind, less salt and taste better
  • sea or kosher salt
  • egg noodles if you're eating it that day
Steps:
  1. In a big pot, add in the chicken. Cover the chicken in water and then pour in any additional water for the amount of soup you'd like to make. Remember, the soup will reduce down by at least 1/4 during the cooking process. It's not an exact science. Cover the pot.
  2. Bring the water up to a boil (takes approx 20 minutes). During this boiling process, you're going to need to keep an eye on it and skim off any of the foamy stuff that is created.
  3. After the skimming is completed, cut the onions and celery in half and add them to the pot, add in the bullion cube and a pinch of salt (1/2 teaspoon)
  4. Bring the mixture up to a boil again and then turn the heat down so its simmering. Let it simmer for 45 min. I alternate cover on, cover off at this point, checking in on the soup every 15 min or so, stirring occasionally as well.
  5. Add in the carrots and parsnips and simmer again for another 40 minutes. Taste it as well to see if you need a bit more salt. 
  6. At this point, snag one of the chickens and see if its cooked. You don't want to overcook the chicken and dry it out. If the chicken is done, grab them and save them for eating later. It's my favorite kind of chicken to use in a pot pie.
  7. You can cook the soup for a few more minutes to reduce it down and bring out more of the chicken flavor if you want. 
  8. Once it's done, let it cool and skim off the fat before serving or freezing.
  9. Yum!

Wednesday, November 2, 2011

Meat Logs

Have you ever tried to eat a meatball sub and lost a ball? Or had a meatball sub and had the meatballs all sliced up so they aren't even close to being ball-shaped anymore? I have. It stinks. At this point, I had a great idea - meat logs! How come no one ever tried it before? I have no idea but I think it's pretty genius. Just shape the meat into a log that fits into the bun for your sandwich and you'll never lose a ball again!

HA! Way too many dirty jokes I could include in there but I'll steer clear... with that said, meat logs!

Meat Logs
Recipe makes 4 logs - serves 2 very hungry people

INGREDIENTS
  • 1 package of ground meat (we used beef)
  • 1 tsp oregano
  • 1 tsp basil
  • 1 tsp garlic powder
  • 1/3 cup italian flavored breadcrumbs
  • 1 good squirt of ketchup
  • 1 good squirt of mustard (we used the grainy kind)
  • Tomato sauce - about a cup or two depending on how much you like on your sandwich
  • Franks Red Hot Sauce
  • Bun - that can handle the meat log!
  • Cheese (optional)
  • 1 tablespoon oil for the pan to cook the logs

STEPS
Mix the spices, ketchup, mustard, bread crumbs and meat together in a bowl till well combined
Prep the buns - make sure they are sliced, and I add a little cheese to the bottom of the bun also
Form the meat into logs that will fit into your bun, we ended up doing two logs per bun since the longer logs wouldn't fit into the pan that we cooked them in
Add the oil into the pan and turn it on to medium
Add the logs one by one into the pan
Brown the outside of the logs by rolling them around in the pan
Add a few drops of Franks to each log at this point, this will sear the Franks to the outside of the log.
Cook the logs till they are cooked through
Cover with tomato sauce and let cook for about 1 minute to heat up the sauce
Plop the meat logs into the bun and top with a bit more cheese
Enjoy! Yum.